Click on HOME to see most recent posts!

Place a Stampin' Up order with me and get a
FREE TUTORIAL OF YOUR CHOICE for every $50 that you spend!

Saturday, March 13, 2010

Post Your Rag Purse Pictures!


I have done a few of these rag purses now and I would love to have a place to see all the ideas in one place. I just found a new linking service, Inlinkz, that will show pictures as well as a link so link up your purse pictures so we can all share the good ideas!!

Friday, March 12, 2010

Rag Purse Matching Mini Notebook


I had to make a matching mini notebook to carry around in my new Scallop Square rag purse!
I made this using the cardboard that comes with Designer series paper and just covered it with a scallop square piece of fabric, just like I used for the purse! It is just plain white printer paper inside stapled together and glued inside the covers.
Here are a few more photos to show how its made...


To see more about the purse CLICK HERE!

Pitcher of Beer - FREE Template


After doing my limeade pitcher, I just had to fill one with BEER!

I cut out the pitcher on whisper white cardstock and inked it with a sponge and Brocade blue to look like glass. The center is Summer sun cardstock with really rust sponged on the edges. The foam on top is very vanilla cardstock.
This would be a great Birthday card for a guy!

CLICK HERE to get the FREE template for the pitcher.

Limeade Pitcher - FREE Template


This is my limeade pitcher that I did for the HSS Inspiration Challenge #6. I used the Tart and Tangy stamp set for the limes and photo paper for the ice cubes.
Here is the inspiration photo. I used the pitcher that is on the bench for my inspiration.


CLICK HERE to get the FREE template for the pitcher.

Thursday, March 11, 2010

Manhattan Flower Purse & Card Set

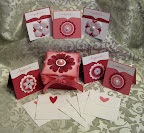
This is my Manhattan Flower Purse & Card Set!
This card kit makes a great gift to give to a friend or a nice set of cards to use yourself! I have shown it with 3 each of 3 different cards but you can make as many or as few as you would like!
This kit uses the Fifth Avenue Floral stamp set and the Manhattan Flower embossing folder, Lattice die and Little Leaves sizzlit with the Big Shot. If you do not have any of these you can easily substitute them out with something similar!

CLICK HERE to see more details or to purchase this kit!

Hershey Kiss Card - FREE Template

This is a great card for chocolate lovers! I just couldn't resist!
What's better then a huge Hershey's kiss?!

CLICK HERE for the FREE template!
This is how I made it:

Fold in half an 11" x 4 1/4" piece of whisper white paper. Print out the template and put it over the folded paper. You can either have the fold at the top or bottom, your choice. I did mine at the top. Cut your your shape and then another single layer of the kiss template that is just larger then your card.


Put tape on the edges of this single kiss shape and fold your aluminum foil over the edges. You want to crinkle up the front a little so it looks like a real Hershey's kiss.


Now with a Brocade blue marker I wrote Hershey on white ribbon and taped it on the back.


Now just tape your foil kiss to the top of the kiss card. This is the back of it showing how it sticks out just a little bit.

Eggs Over Easy

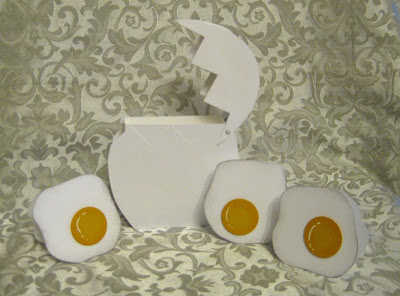
I was cooking eggs and thought how funny it would be to do egg cards in my big egg box that went with the chicks. These cards are 3"x3" so they will fit in the little envelopes too!
If you want to see the egg box tutorial with chicks, CLICK HERE!
If you want to see how to make the eggs(with a side of bacon!) CLICK HERE!

Yet another Purse...


Ok, I'm sorry if you are sick of seeing these purses but I am hooked! I love them and they are so easy to do! This one I put a magnetic clasp on to keep it closed. It also has the inside pocket and side pockets that I show in my tutorial!

I also have a tutorial to show how to make them with the Top Note die. If you are interested CLICK HERE to see all the details!

Easter Bunny Fancy Favor Basket!


When I case something from someone else I usually change it around a little but but this one was too perfect to change! I love it! This is by far my favorite punch art bunny that I have seen. I got this from Raidis Smet's site, Seep and Keep.
To see where I cased this idea from and get the full directions CLICK HERE!

Wednesday, March 10, 2010

My New TOP NOTE Rag Purse!


My TOP NOTE Rag Purse!


A close up!

I'm sure by now everyone has seen the rag purses using the scallop square die and the big Shot. I decided to change it up a bit and make one using the TOP NOTE die and the Big Shot! Using this instead gives it a totally different shape! You can easily add more Top Note shapes and make it as big or small as you want to. The overall size for this small purse I have shown is 8" x 4" x 6".
I have added pockets to the outside and inside of my purse and added a reinforced bottom. The main construction of the purse is the same as the scallop square purse(and you can add these pockets on your scallop square die-cut purses and it will work the same way!) but the steps are a little different to add all of the pockets and the base.
Here are some photos of the pockets!
My purse is made using just one pattern of fabric for the exterior and another for the lining but you can pick as many different patterns and mix and match as you want!


I recently found out that Angie Juda was the creator of the original Scallop Square rag purse. I had seen so many, I didn't know where they began. Such a great idea!
You can see her site by CLICKING HERE.

Tuesday, March 9, 2010

Another Card with my Fun Fold!

I had to try another card with this fold! This is using the Voila to Go stamp set.
CLICK HERE to see how to do this!
I used a 6" x 6" DSP to make this one. To get the scallop edge punch to come out evenly to go around this start with a 5 1/4" square white paper.

A Fun Fold

I was playing around with this fun fold using a square piece of Welcome Neighbor DSP. I did this for a challenge on the Technostamper site. CLICK HERE to see the challenge details.
This is the sketch below.

This is how I did the paper folds:

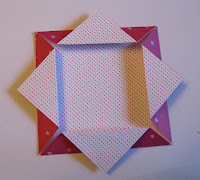
Fold a square piece of paper so all the points meet in the middle. About half way across, fold the points back out.


It will look like this when your done! It makes a really nice frame.


*** Someone just showed me the link to directions on splitcoast in my comments! Here is the link!

Monday, March 8, 2010

FREE TEMPLATE Wedding Card!

I made this card for the Late Night Stampers "Bring on the Bling" Challenge! It's hard to see how shiny this is but the dazzling diamonds really sparkle!
As long as I was doing it I figured I would make the template to share with you guys! This is huge for me because that means I had to actually think about what I was doing first instead of just cutting as I go!

CLICK HERE to get the FREE TEMPLATE!

Here are the steps:
I printed out the template and cut the dress out of Bride Specialty Designer Series Paper. I centered the dress shape on the texture in the paper so it would be symmetrical. I cut out the extra pieces of the dress and put them on with a dimensional only at the bottom. I then used a two way glue pen to trace some of the swirls in the paper and add some dazzling diamonds.


I used a piece of 1/4" white grosgrain ribbon with a rhinestone brad in the center for the waist.


For the tux, I cut the outside and tie out of black paper. For the tux shirt I used the other pattern of Bride Specialty Designer Series Paper with the stripes. I used the mini rhinestone brads for buttons.


The card is 4 1/4" x 5 1/4" so the dress and tux shirt can stick up and still fit in the envelope. I had it open in the middle instead of on the side and I put the dress over the opening to hide it. Both the dress and tux I put on with dimensionals.


For the inside I used the Priceless stamp set for the swirls. Hope you like it!!

To see my other card similar to this CLICK HERE.

Sunday, March 7, 2010

Teatime Pot and Cups Card Kit

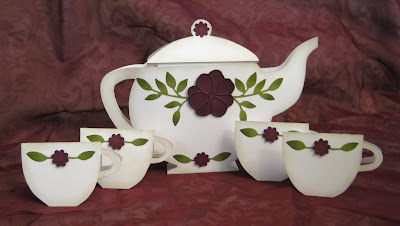
This teapot card set is the perfect gift to give any tea lover! The decorative teapot doubles as a box and easily holds 4 teacup cards and 3” x 3” envelopes or more. Tea bags will fit inside the teacup cards as a nice gift. This would be a great gift for a little girl also! Perfect for doll tea party invitations!

CLICK HERE to find out more details or to order the kit!

Related Posts with Thumbnails